Showing posts with label Tops. Show all posts

Wednesday, May 25, 2011

McCall's 6062 - View A Tutorial

P1040556
Hello everyone!I am back after a long absence. I have come to the realization that one tutorial a month is all I can juggle for now. I wish my activity on this blog was a bit more prolific, but hey, it is what it is! This month I am bringing you a cute girl's top. It's the View A of McCall's 6062. This pattern is very easy to make and as you can see it turns out quite nice! I made the above top for my friend's daughter. Want to know how to make one?

One thing I would like to note is that I finished my tops a bit differently than the original. First of all, the pattern was WAY too long for this girl, so I had to shorten it quite a bit. Second, you'll notice that the original top has a ruffle on the bottom:


Well, I didn't want to deal with a ruffle this time. Plus, I made a true novice mistake. When I measured my model’s length, instead of leaving a couple of inches to make the hem, I cut the fabric at the hemline!! Duh! So one of the tops I finished with home made bias tape and the other with a bit of lace trim I had lying around. They turned out fine and easier to maintain than a ruffle, I think. So I apologize in advance for not covering that step in this tutorial. It seems easy enough to make, though!

OK, so let's get to work! Cut out your pattern pieces. Put the front and back pieces right sides together. Stitch along the sides with a 5/8” seam allowance (this is the seam allowance to be used for the whole project) and serge.

P1040319P1040320

Now it’s time to put the sleeves together. Fold them like the picture below, right sides together and stitch along the short sides. Serge. Press the seam to one side.

P1040321P1040322

To hem the sleeves, turn in the sleeves 5/8” and press. Fold out and align the raw edge with the crease you just created. Press. Turn in along the crease and press again. Then stitch. Your sleeve is hemmed!

P1040323P1040324P1040325P1040326P1040327

Now we’re going to attach the sleeves. This part is tricky but it can be done. Be patient! Step 4 of the pattern is where this procedure is explained, and I must say it’s pretty clear. My pictures below will give you a more visual guidance. Remember to go SLOW as you sew along that curve. Don’t forget to serge or finish this seam once you’re done!

P1040328P1040329P1040331P1040332

This is what your top looks like so far. Imagine both sleeves are attached :-).

P1040333

Time to make the casing for the top elastic. Turn the neck edge to the inside along the foldline, which happens to be 5/8” from the edge. Press. The pattern tells you to turn in 1/4” on the raw edge, but since I’ll be using 1/4”-wide elastic, I think this is too tight. I turned in 3/8” instead. Press and saw very close to the edge. Remember to leave an opening for the elastic!

P1040334P1040335

Steps 6 and 7 should be left for the very end, in my opinion. I don’t think this is a good time to insert the elastic. So let’s move on the casing for the waist elastic. Place pattern piece 5 on one of the casing pieces and use pins to mark the location of the opening. Two things to note here:

1) The opening is exactly 3/4” which is too tight for a 3/4”-wide elastic. I made the opening a bit bigger. Between 3/4” and 1”.

P1040336

2) I am not sure what the point is of leaving an opening on both sides. After all, you insert the elastic through one opening only. Because it was my muslin, I left an opening on both sides, but while making the final top I only did so with one.

P1040337

Moving along, press the seam allowances flat to the sides. Then turn in the long edges and press.

P1040338P1040339

Using the pattern as a guide, determine where the casing should be sewed. The upper edge of the casing should match the placement line. Pin carefully and stitch the top and bottom very close to the edges.


P1040340P1040341

This is what it should look like!

P1040343

Insert the elastic and use a slipstitch to close the opening.

P1040553

Now is a good time to insert the elastic at the top of the garment and stitch the opening shut. Sorry I don’t have a picture of that step.

So again, this is what the top looks like. Now go make one for that special little girl in your life! And please DO let me know if you have any questions!

P1040556

Wednesday, March 23, 2011

Schoolhouse Tunic–Final part

Hello everybody! Are you ready to finish your tunic today? We’re going to cover steps 8, 9,  and 11 of the pattern instructions. I am actually going to skip step 10, because I have decided not to make sleeve casings or add elastic to the sleeves, just hem them. Let’s go!

***************************************************************************

STEP 4: PREPARING AND SEWING THE TUNIC SKIRT
First of all we need to make the pleats, both on the skirt front and back. Grab the skirt back and determine the middle by folding it in half lengthwise. Place the skirt back on a flat surface, right side up. Mark the middle with a pin. Now pin the notches you transferred from the pattern on either side.

P1040304

Fold one of the side notches…

P1040305

…and bring it over to meet the middle of the skirt. (Note to self: Get a manicure!)

P1040306

Repeat on the other side.

P1040307

Now baste this pleat in place, 1/4” from the edge. Press this pleat for a nice, crisp look. It will also prevent it from shifting when you attach the skirt to the bodice.

P1040308

Now grab the skirt front, lay it flat right side up, and repeat this same process. The only difference is that the skirt front has two smaller pleats to the sides. Mark the pleats...

P1040309

… and baste. Then press.

P1040310

Place the skirt front and back, right sides together. Pin in place along the sides.

P1040311

Stitch! It is time to serge/zig-zag your side seams. Do this and then press them towards the back of the skirt. In this case, and because I am short on time today and it’s just a muslin, I skipped this. But you definitely shouldn’t!

P1040312

Now we’re going to attach the skirt to the bodice. First lay the bodice on the table, turned inside out and upside down. Open it. Then place the skirt, right side out, inside the bodice. Make the side seams match and pin in place.

P1040313

Then pin the bodice and skirt front together. Make the plackets meet and make sure that there is no space between them.

P1040314

This is what the side seams look like when they come together. Both of them should be oriented towards the back.

P1040315

Now you’re going to stitch all around. You’re going to start to the left of the left placket and, because this is a stress point, go back and forth on this area 3 or 4 times to reinforce this stitch, then continue sewing all around. Please disregard my horrible stitches. This is just for illustration purposes. Of course you’ll do much better when you work with the final fabric! :-) Now serge or zig-zag this seam to finish it. Press the seam allowance towards the skirt.

P1040316

It is a good time now to try on your tunic and make sure it fits well. Also, determine how long you want it and make the necessary hem adjustments. If you’re happy with the length, hem the tunic as instructed in step 11. It is super straightforward so I won’t show you how to do it here.

You are done!! Can you believe it? Here is my muslin. The front…

P1040317


…and the back.

P1040318

You can see more pictures of some schoolhouse tunics I have made in my flickr pool.
Thank you for sewing along with me! I would love to see your creations. Please leave me a comment if you have any questions. I’ll do my best to answer them! Happy sewing!

Quick links:
Schoolhouse Tunic Tutorial
Schoolhouse Tunic – Part 2
Schoolhouse Tunic – Part 3

Tuesday, March 15, 2011

Schoolhouse Tunic – Part 3

Hello everybody! I am sorry for the long absence. Birthday celebrations for both my husband and myself got in the way… :-)

Are you ready to attach the sleeves to your tunic? Today we’re going to cover steps 6 and 7 of the pattern instructions. Let’s go!

***************************************************************************
STEP 3: ATTACHING THE SLEEVES TO THE BODICE

We need to run two basting stitches between the notches (that were transferred from the pattern) on the sleeves. For this, you need to increase the stitch length on your machine as far as it will go. On my machine the setting for the longest stitch is 4. It may be different on your machine. So grab one of your sleeves and sew once 1/4” from the edge from notch to notch (indicated by the red arrows). Then make another row of stitches 3/8” from the edge. You will gather this section slightly when you attach the sleeve to the bodice. The blue arrow indicates the top notch, that should be placed right against the shoulder seam.

P1040202

At this point the pattern indicates that the bodice should be placed flat, right side up. I believe it should be wrong side up, as shown below. Now start pinning the sleeve against the bodice, right sides together, matching the notches on the sleeve with the corresponding ones on the bodice. You will have to gather the sleeve slightly to make the sleeve fit to the bodice. The amount of gathering you need to do is minimal but necessary.

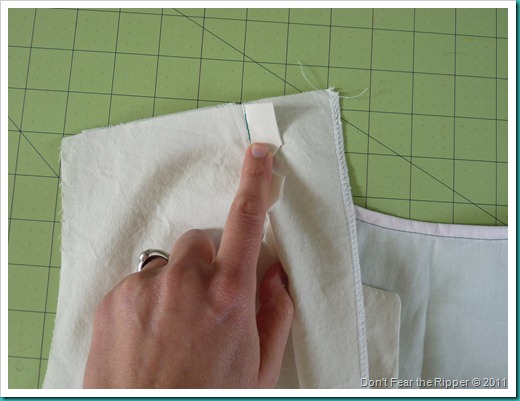
Now, you need to know that one of my biggest pet peeves is attaching set-in sleeves. I hate it. But I have also learned that, at least for me, the best way to do is with the sleeve on the bottom. So when you pin both pieces, you need to think about where you will start sewing, so if you're like me and you pin parallel to the edge instead of perpendicularly, you must orient the pins accordingly. In this case I will start sewing on the right. As you sew the sleeve, remember to go SLOW. You will have to make adjustments to the fabric as you move it through the sewing machine. Just take your time and it will be alright. You can do it! If it doesn't turn out right, don't fear the ripper and start over...

P1040205

Here is the sleeve already sewn with the seam finished. Under normal circumstances I would also get rid of the basting stitches, but that’s optional. Now press the seam towards the sleeve.

P1040206

Up next, we have to sew the side of the bodice and the sleeve. Fold the piece right sides together, making the sides of the bodice and the sleeves match. Here you need to think of where you will begin sewing. In this case, because the seam allowance is turned towards the sleeve, it is more practical to start sewing at the bottom of the bodice (which in this case is at the top) so that the seam allowance doesn’t get caught under the presser foot.

P1040207

Here is the sleeve all sewn and the seam finished. Now is a good time to hem the sleeve! Fold the hem twice 1/4” to the inside and press well. Sew it all around and you’re done!


P1040208

Now repeat this whole process with the other sleeve and your bodice is READY! Now is a good time to try it on and make sure that it feels ok on you and that it fits you well.

P1040209

Next time I will show you how to finish the tunic by making the skirt and attaching it to the bodice. Stay tuned!

Quick links:
Schoolhouse Tunic Tutorial
Schoolhouse Tunic - Part 2
Schoolhouse Tunic - Final Part

Tuesday, March 8, 2011

Schoolhouse Tunic – Part 2

Before we go on with our tunic bodice today, I just wanted to ask you: Do you have bad sewing days? You know, those days where your machine just won’t cooperate, or your fine motor skills are just off and so you find ripping your seams more often? Well, yesterday, while I was preparing this part of the tutorial, was one of those days for me… :-(

Anyway, let’s move on to finish the tunic bodice! Today we’re going to cover steps 4 and 5 of the pattern instructions.

**************************************************************************
STEP 2: ATTACHING FRONT AND BACK BODICE PIECES

Grab one of the plackets and place it on the bodice back, right sides together. Align the top raw edge of the placket with its corresponding shoulder.

P1040067

Lift the placket flap and the seam allowance and move them out of the way.

P1040068

Now sew the shoulder using a 1/4” seam allowance. Sew between the edge where the sleeve will be attached and stop at the placket seam.

P1040069

Finish the shoulder seam either with the serger or a zig-zag stitch.

P1040072

Now take the seam allowance and fold it down towards the bodice front. Fold the top of the placket 1/4” to the inside as well.

P1040073

Bring the placket back in place. Pin it all the way down.

P1040074

Now you’re going to attach the placket to the bodice front. To do so, topstitch beginning at the shoulder seam all the way down. I used my serger stitches as my guide.

P1040075

Now handstitch the top of the placket to the shoulder. Make sure that your stitches don’t show on the right side of the garment by attaching the placket to the seam allowance.

P1040076P1040077P1040078

Repeat this whole process with the other placket to attach it to the other shoulder!

Now you’re going to topstitch all the way around the neck area. See the start and finish points (and try to ignore my slip-ups if you can…). Note: The pattern instructs you to stitch 1/4” from the outer edges. I opted to do it closer to the edge, but that’s just me!

P1040079-1

This is how the placket should look from the right side.

P1040080

Congratulations! You’re done with this step!

Check back soon to see how to attach the sleeves to the bodice. Let me know if you have any questions. Or leave me a comment. I love comments!

Quick links:
Schoolhouse Tunic - Part 1
Schoolhouse tunic - Part 3
Schoolhouse tunic - Final Part