Tuesday, March 8, 2011

Schoolhouse Tunic – Part 2

Before we go on with our tunic bodice today, I just wanted to ask you: Do you have bad sewing days? You know, those days where your machine just won’t cooperate, or your fine motor skills are just off and so you find ripping your seams more often? Well, yesterday, while I was preparing this part of the tutorial, was one of those days for me… :-(

Anyway, let’s move on to finish the tunic bodice! Today we’re going to cover steps 4 and 5 of the pattern instructions.

**************************************************************************
STEP 2: ATTACHING FRONT AND BACK BODICE PIECES

Grab one of the plackets and place it on the bodice back, right sides together. Align the top raw edge of the placket with its corresponding shoulder.

P1040067

Lift the placket flap and the seam allowance and move them out of the way.

P1040068

Now sew the shoulder using a 1/4” seam allowance. Sew between the edge where the sleeve will be attached and stop at the placket seam.

P1040069

Finish the shoulder seam either with the serger or a zig-zag stitch.

P1040072

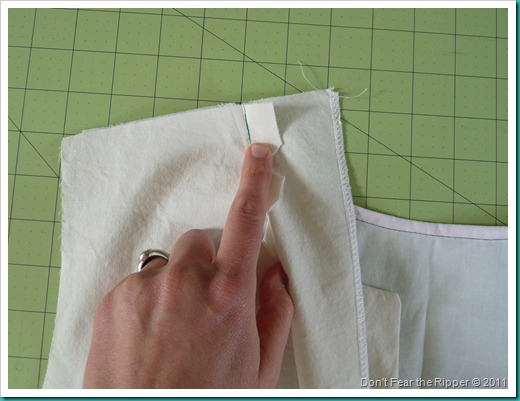
Now take the seam allowance and fold it down towards the bodice front. Fold the top of the placket 1/4” to the inside as well.

P1040073

Bring the placket back in place. Pin it all the way down.

P1040074

Now you’re going to attach the placket to the bodice front. To do so, topstitch beginning at the shoulder seam all the way down. I used my serger stitches as my guide.

P1040075

Now handstitch the top of the placket to the shoulder. Make sure that your stitches don’t show on the right side of the garment by attaching the placket to the seam allowance.

P1040076P1040077P1040078

Repeat this whole process with the other placket to attach it to the other shoulder!

Now you’re going to topstitch all the way around the neck area. See the start and finish points (and try to ignore my slip-ups if you can…). Note: The pattern instructs you to stitch 1/4” from the outer edges. I opted to do it closer to the edge, but that’s just me!

P1040079-1

This is how the placket should look from the right side.

P1040080

Congratulations! You’re done with this step!

Check back soon to see how to attach the sleeves to the bodice. Let me know if you have any questions. Or leave me a comment. I love comments!

Quick links:
Schoolhouse Tunic - Part 1
Schoolhouse tunic - Part 3
Schoolhouse tunic - Final Part

Friday, March 4, 2011

Tutorial para la “Túnica Schoolhouse”

P1030951

¡Hola a todos de nuevo! ¿Listos para un proyectito nuevo? Hoy les presento la "Túnica Schoolhouse" (o Schoolhouse Tunic) de Sew Liberated. Esta túnica es una de mis prendas favoritas para coser porque es fácil y también porque es preciosa. En mi opinión, favorece a todos los cuerpos. Se puede usar sola, o encima de vaqueros, calzas con botas, un traje de baño, etc. Existe la opción de hacerla más corta y usarla como blusa también. De cualquier modo, como la abertura de adelante es bastante grande, HAY que usarla con algo abajo, como por ej. una camiseta o musculosa. También se le puede agregar elástico en las mangas, pero yo opté por no hacer eso. ¡Quizá ustedes puedan!

Para ver lo que otras personas han hecho con esta túnica, visiten el grupo de Sew Liberated en flickr. ¡Se van a impresionar de ver todas las posibilidades que ofrece esta túnica!

Como me encanta tanto, hace un tiempo le pedí permiso a Meg, la diseñadora del molde, para escribir un instructivo. Muy amablemente me dijo que sí. Espero que les dé ganas de hacerse esta túnica. Las instrucciones del molde son super claras. ¡Aquí vamos!

***************************************************************************
PASO 1: PREPARACIÓN DE LAS PECHERAS FRONTALES Y DE LA ESPALDA

Hoy vamos a concentrarnos en los pasos 1 a 3 de las instrucciones del molde. Empezamos cortando todas las piezas. Debería haber 10 en total.

Yo voy a trabajar con muselina, primero porque es una tela más barata y segundo porque creo que utilizar una tela de un color claro y liso distrae menos, y es más clara de ver que una tela estampada.

En primer lugar, tomar las entretelas (si alguien conoce un término mejor para esta pieza, ¡por favor que me avise!) y terminar el borde que se muestra aquí. Este borde va a quedar expuesto, y por lo tanto creo que debería terminarse para que no se deshilache. Como pueden ver, lo hice con mi máquina overlock (¡a la que ADORO!), pero también se puede terminar con una puntada zigzag en la máquina de coser.

P1030983

Ahora, tomar una de las pecheras y colocarla contra la entretela, derecho con derecho, como se muestra.

P1030984

Coserlas con un margen de costura de 5/8” (5/8 de pulgada), así:

P1030985

Antes de dar vuelta esta pieza, es necesario hacer cortes en la curva y rebajar la esquina, como se muestra a continuación. Esto es importante porque si no la pechera quedará muy abultada. ¡Cuidado de no cortar los puntos!

P1030986

Dar vuelta la pechera hacia afuera y empujar la esquina hacia afuera cuidadosamente con un objeto con punta. Debería quedar así.

P1030987

Planchar bien la pechera. Ahora repetir este procedimiento con la otra entretela y la otra pechera. ¡Las dos pecheras quedaron listas!

A continuación, vamos a coser el ribete pequeño a la espalda. Esto sirve para reforzar la túnica alrededor de la nuca. Corté el ribete de una tela diferente, estampada, para que sea más fácil verla del derecho y del revés. Doblar el ribete y la espalda a la mitad para encontrar el punto medio. Colocar el ribete sobre la espalda, derecho con derecho, a la altura de la curva de la nuca, y alinearlos en el medio.

P1030989

Ahora vamos a sujetar el ribete a la nuca, a lo largo del borde. Primero vamos hacia un lado…

P1030990

…y después hacia el otro.

P1030991

Coser con un margen de 5/8”. Tómense su tiempo porque coser a lo largo de una curva es distinto de coser una línea recta. Debería quedar así:

P1030992

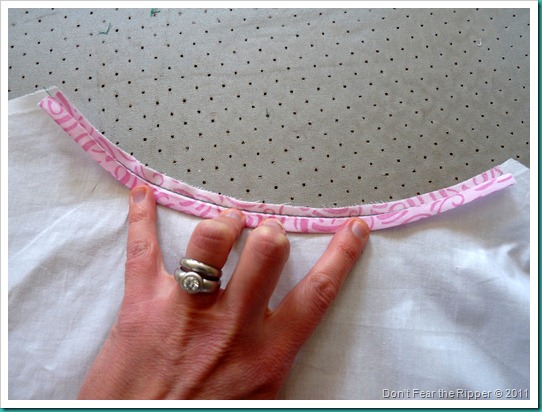
Ahora tenemos que recortar el margen de costura a 1/4”. Con una tijera, cortar a 1/4” de la costura, todo a lo largo de la curva de la nuca.

P1030993

Debería quedar así:

P1030994

Ahora doblar el ribete hacia arriba, hacia su propio revés, alineando el borde con la costura, y planchar.

P1040005

Debería quedar así:

P1040006

Hasta ahora hemos estado mirando el derecho de la pieza de la espalda, ¿verdad? Ahora tenemos que darla vuelta de modo que la vemos del revés. Vamos a doblar el ribete otra vez hacia arriba, pero esta vez vamos a encerrar el margen de costura de 1/4”, como se muestra. Dicho de otro modo, vamos a llevar el ribete hacia el revés de la espalda, encerrando al mismo tiempo el margen de costura.

P1040007

Ahora doblar una vez más hacia el revés.

P1040008

Asegurar con alfileres.

P1040009

Vamos a coser esta curva con un pespunte bien cerquita del borde de abajo. Nuevamente, vayan despacio y tómense su tiempo.

P1030998

Así debería quedar al terminar. A juzgar por la mala calidad de mi costura, es obvio que no fui despacio y no me tomé mi tiempo… bueno, no importa, ¡es una prueba de todas maneras! Cuando use tela "de verdad" voy a ir con más cuidado. “-)

P1030999

Vuelvan pronto para la próxima entrega, donde les voy a mostrar cómo terminar la parte superior de la túnica. Déjenme un comentario si tienen preguntas. ¡Gracias por visitarme!

Enlaces rápidos:
Túnica Schoolhouse - Segunda parte
Túnica Schoolhouse - Tercera parte
Túnica Schoolhouse - Ultima parte 

Schoolhouse Tunic Tutorial

P1030951

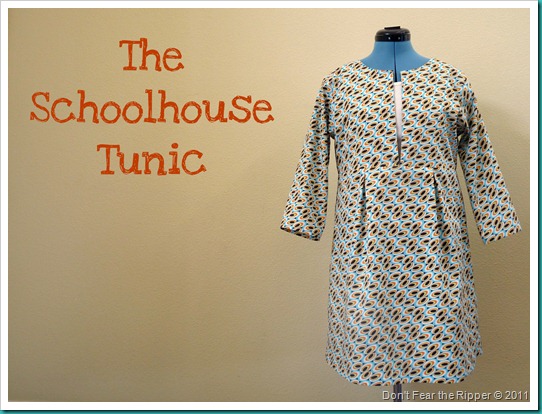
Hello again everybody! Are you ready for a new project? Today I present you the "Schoolhouse Tunic" by Sew Liberated. This tunic is one of my favorite garments to make because it is easy and also because it is beautiful! I think it flatters just about any body type. It can be worn by itself, over jeans, leggings and boots, a bathing suit, you name it. You have the option to make it shorter as well and wear it as a blouse. Either way, as the front opening is quite big, you DO need to wear a cami or tank top below. You also have the option of adding elastic to the sleeve hems, but I have not done that. Maybe you can do it!

To see what other sewists have done with this tunic, check the Sew Liberated flickr pool. You'll be amazed to see how many possibilities the Schoolhouse Tunic presents!

Since I am so in love with this tunic, some time ago I asked the pattern creator, Meg, for permission to write a sew-along tutorial for it. She was super nice and said yes! I hope you feel encouraged to make one for yourself. The pattern instructions are super clear. So here we go!

***************************************************************************
STEP 1: PREPARING THE FRONT BODICE PIECES AND THE BACK BODICE PIECE

Today we're going to cover steps 1-3 of the pattern instructions. Go ahead and cut your pattern pieces. You should have 10 in total.

I am going to work with a muslin, first because it’s cheaper, and second because I think that a solid light fabric is less distracting and clearer to see than one with a print.

First of all, grab your plackets and finish the raw edge shown here. This edge will be exposed and so I think it should be finished in order to avoid fraying. As you can see I serged it (I LOVE my serger!), but you can use a zigzag stitch with your regular sewing machine.

P1030983

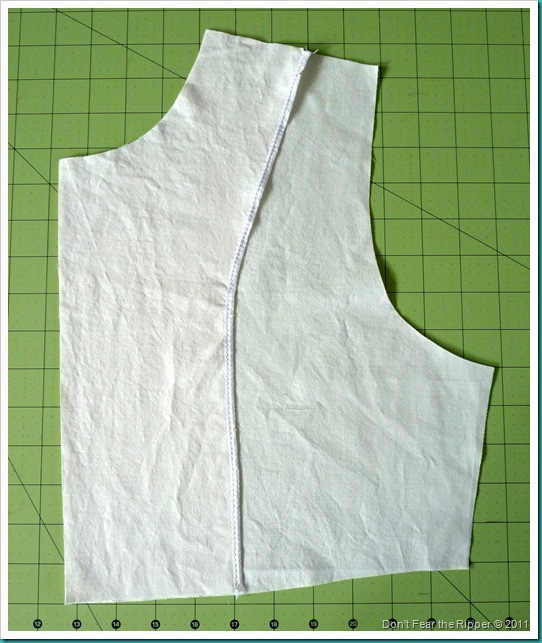
Now, grab one bodice front and one placket and place them right sides together, as shown.
P1030984

Sew them together with a 5/8” seam allowance, as shown.

P1030985

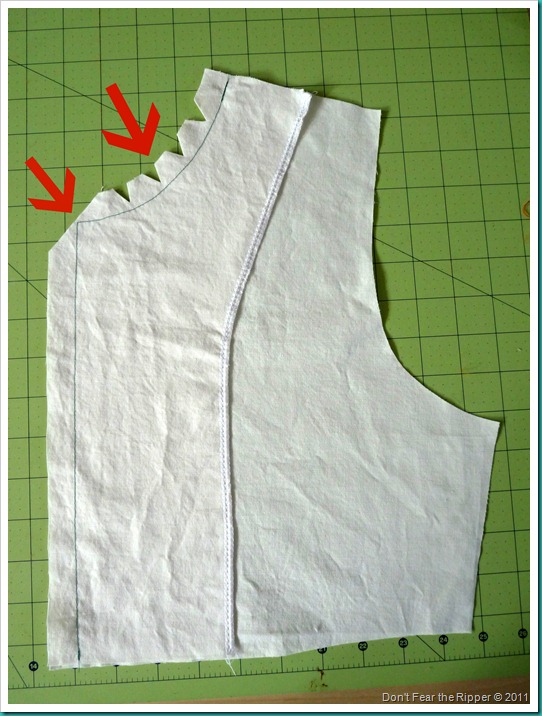
Before you turn this piece inside out, you need to clip the corner and the curve. See below. This is very important because it reduces unwanted bulk. Be careful not to cut through your stitches!
P1030986

Now turn the piece inside out. Use a pointy object to carefully push out the corner. It should look like this.

P1030987

Press this piece very well. Now grab your other placket and front bodice piece and repeat this procedure. Your two front pieces are ready!

Next, we’re going to attach the small bias binding piece to the bodice back. This is done to reinforce the neck area of the tunic. I cut my binding piece from a different fabric, with a pattern, so it will be easier for you to see its wrong and right sides. Fold the bias binding and the bodice back to find the middle. Place the bias binding on top of the bodice back, right sides together, at the neck curve, and align the middle points.

P1030989

Now, start pinning the bias binding to the raw edge of the neck curve. Go to one side first…

P1030990

…and then to the other side.

P1030991

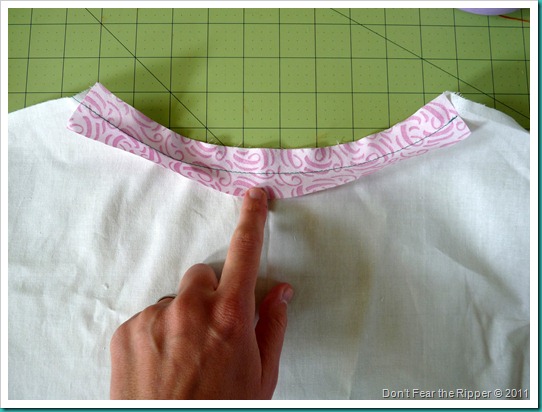
Now, sew these pieces together with a 5/8” seam allowance. Take your time doing this as you’re sewing on a curve. When you’re done, it should look like this:
P1030992

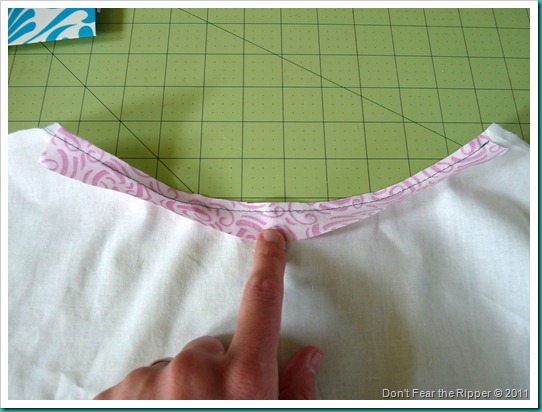
Now you need to trim the seam allowance back to 1/4”. Grab your scissors and cut 1/4” away from your seam, all the way along the neck curve.

P1030993

It should look like this when you’re done:
P1030994

Now fold the bias binding UP towards its wrong side, aligning the raw edge with the seam, and press.

P1040005

It should look like this:

P1040006

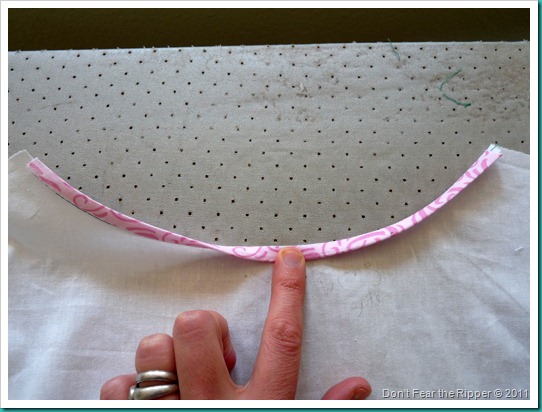
All this time, you have been facing the right side of the bodice piece, right? Now you need to turn it over so that you’re facing its wrong side. You’re going to fold the bias binding up once again, but this time you will enclose the 1/4” seam allowance, as shown. In other words, you will be bringing the bias binding over to the wrong side of the back bodice, enclosing the seam allowance in the process.

P1040007

Now fold down towards the wrong side, once again.
P1040008

Pin this in place.

P1040009

You are going to stitch this neck curve very close to the bottom folded edge. Again, go slow as you’re sewing along a curve. Take your time!

P1030998

This is what it should look like when you’re done. Judging by the poor quality of my stitches, it’s pretty obvious that I didn’t go slow and I didn’t take my time… oh well, it’s just a mockup anyway! I’ll be much more careful when I make the tunic with “real” fabric. “-)

P1030999

Stay tuned for my next post, where I’ll show how to finish the the bodice. Let me know if you have any questions! Thanks for stopping by!

Quick links:
Schoolhouse tunic - Part 2
Schoolhouse tunic - Part 3
Schoolhouse tunic - Final Part